

This article is part of a series on building a full stack application.
- Part 1: Introduction
- Part 2: Hasura Cloud and database (current)
- Part 3: Setting up the IDP
- Part 4: Configuring the frontend
- Part 5: Coding the frontend
Overview
In this guide, we will walk through the process of setting up a Hasura Cloud project and configuring the data structure for our movie application. Hasura needs to be connected to a database. For this project, we will utilize a free Neon PostgreSQL database. Additionally, we’ll need a unique tenant name, which will be used across various steps. Feel free to choose a distinctive name such as {name}-movieapp for your tenant.
This article will cover the following steps:
- Setting up prerequisites.
- Creating a Neon PostgreSQL database.
- Configuring Hasura Cloud.
- Initializing the database schema and seeding it with data.

Setting up prerequisites
Before we proceed, make sure to complete the following prerequisites:
- Checkout Git Repository:
Start by checking out the repository associated with this project. This will provide you with the necessary files and structure for our full-stack web application.
- Install Hasura CLI:
Ensure you have the Hasura Command-Line Interface (CLI) installed. If you haven’t done so yet, you can find detailed instructions on how to install it in the official Hasura CLI documentation.
Creating a Neon PostgreSQL database
To begin, navigate to Neon and sign up for an account. Follow their documentation guide on creating your first project and database. This process is quick and should only take a few minutes to complete.
During the setup, at the final step within the connection details modal, you’ll find the connection string for your database. It’s crucial to copy this connection string and store it securely, as we will be using it to configure Hasura Cloud in the subsequent steps. Having this connection string available is necessary to complete the Hasura cloud configuration.
Configuring Hasura Cloud
Head to the Hasura cloud signup page, create a new account and login. Upon logging in, you’ll find yourself on the Hasura Cloud dashboard. From the dashboard, create a new project. Once the project is created, be sure to rename it to the tenant name you’ve determined before.
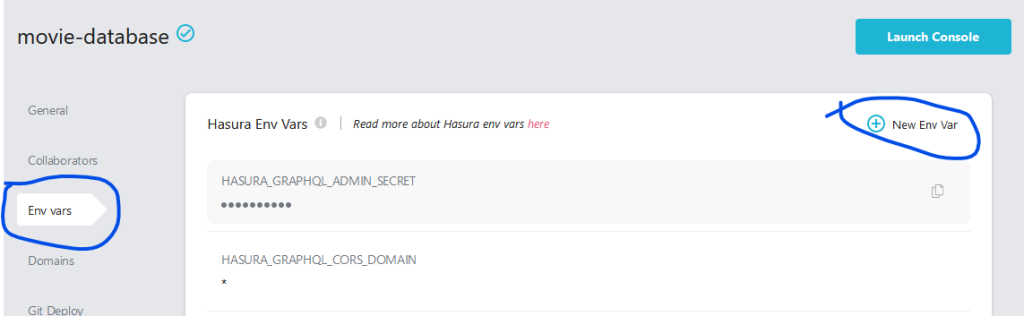
Within your project settings, navigate to “Env vars”. Click on “New Env Var”. Enter the key name as “PG_DATABASE_URL” and paste the previously stored connection string from the Neon PostgreSQL database into the value field. Click “Add” to save the environment variable. Now, click the prominent “Launch Console” button to access the Hasura console interface.

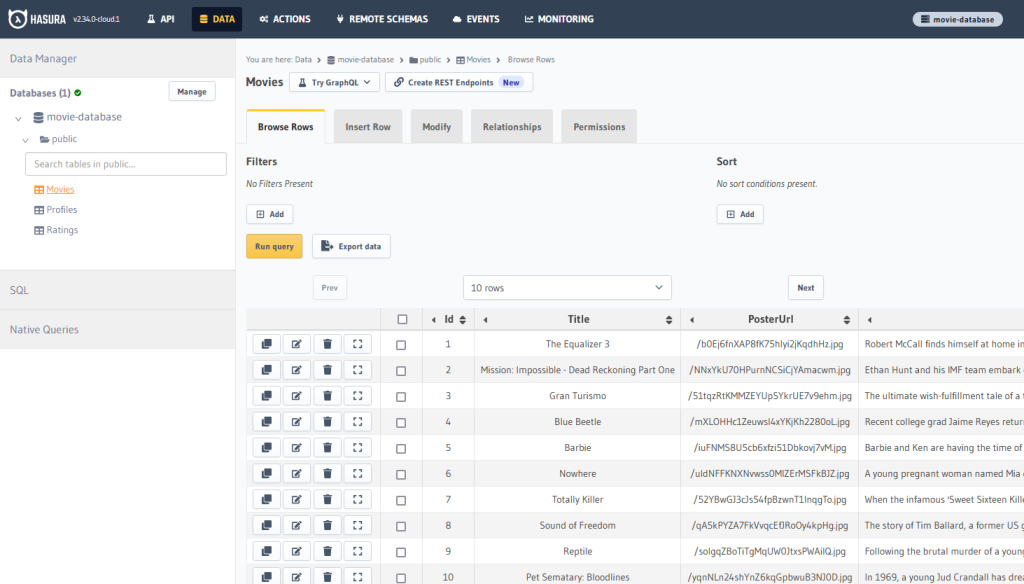
In the console, go to the DATA page. Click “Connect Database”. At the bottom of the page, select “Connect Existing Database”. Provide “movie-database” as the database name. Choose “Environment variable” for the “Connect Database via” option. Insert “PG_DATABASE_URL” as the environment variable. Finally, click “Connect Database” to establish the connection.
Initializing the database schema and seeding it with data
Let’s initialize the database schema and seed it with data for your Hasura Cloud project. Follow these steps carefully.
Open the git repository you cloned earlier in Visual Studio Code. Locate and open the config.yaml file inside the hasura folder. Add your Hasura Cloud project endpoint and the admin secret (which can be copied from the project settings page). Save the changes in the file.
Open the command line and navigate to the hasura folder using the cd command. We’re going to apply the database schema and seed it with example movies. To do this execute the following commands in succession:
hasura deploy
hasura seed apply
Verify in the Hasura console that the database schema and data have been applied successfully. If you receive the error validating current directory failed: cannot find [config.yaml], then verify you are in the hasura folder that contains the config.yaml file. Use pwd or ls -la to verify.
By following these steps, you will have initialized the database schema and populated it with sample data, setting the foundation for your movie application in Hasura Cloud.
Conclusion
We’ve now successfully set up a Hasura Cloud project and configured the data structure for our movie application. In the next article, we’ll set up the authentication provider and configure it to work with Hasura Cloud.
Parts
- Part 1: Introduction
- Part 2: Hasura Cloud and database (current)
- Part 3: Setting up the IDP
- Part 4: Configuring the frontend
- Part 5: Coding the frontend